Monday, December 16, 2013

How to Run UiAutomator Tests?

As of now, you have seen some posts on the writing the UiAutomator test code. Now, we see how to run the UiAutomator tests on the Android device

Steps to run UiAutomator tests
  1. Create required build configuration file to build the output jar
  2. Set ANDROID_HOME environment variable
  3. Build the configuration file using ANT
  4. Copy the output Jar file to the device
  5. Run the UiAutomator Test case

Google has provided good documentation on how to run the test. You can find simple steps below

Step 1: Build configuration file
<android-sdk>/tools/android create uitest-project -n <name> -t 1 -p <path>
The <name> is the name of the project that contains your uiautomator test source files, and the <path> is the path to the corresponding project directory.
-t is the target ID. To get the target ID, run the command "android list targets", which will list the available targets
$ android list targets
Available Android targets:
----------
id: 1 or "android-8"
     Name: Android 2.2
     Type: Platform
     API level: 8
     Revision: 3
     Skins: WVGA800 (default), WQVGA400, HVGA, QVGA, WQVGA432, WVGA854
     ABIs : armeabi
----------
.
.
----------
id: 11 or "android-17"
     Name: Android 4.2.2
     Type: Platform
     API level: 17
     Revision: 2
     Skins: WVGA800 (default), WQVGA400, HVGA, WSVGA, QVGA, WXGA800, WXGA800-7in, WXGA720, WQVGA432, WVGA854
     ABIs : armeabi-v7a
----------
id: 13 or "android-18"
     Name: Android 4.3
     Type: Platform
     API level: 18
     Revision: 2
     Skins: WVGA800 (default), WQVGA400, HVGA, WSVGA, QVGA, WXGA800, WXGA800-7in, WXGA720, WQVGA432, WVGA854
     ABIs : armeabi-v7a
 

Select the target ID from the above list, suppose if you want to run on Android 4.2.2, choose the target as "17". Please note that the target ID varies from machine to machine.

Step 2: From the command line, set the ANDROID_HOME variable:
  • In Windows:
    set ANDROID_HOME=<path_to_your_sdk>
  • In UNIX:
    export ANDROID_HOME=<path_to_your_sdk>
Step 3: Go to the project directory where your build.xml file is located and build your test JAR.
ant build
Step 4:  Deploy your generated test JAR file to the test device by using the adb push command:
adb push <path_to_output_jar> /data/local/tmp/
 Here’s an example:
adb push ~/dev/workspace/LaunchSettings/bin/LaunchSettings.jar /data/local/tmp/

Step 5: Running UIAutomator Test
adb shell uiautomator runtest <JAR> -c <Class Name>
Here’s an example of how to run a test that is implemented in the LaunchSettings.jar file. The tests are bundled in thecom.uia.example.my package:
adb shell uiautomator runtest LaunchSettings.jar -c com.uia.example.my.LaunchSettings

Shell Script:

I have written shell script to make this job simple
  • Copy both "run.sh" and "build.sh" to your local directory
  • Provide executable permissions (chmod 777 <File>)
  • Run the following command 
    ./run.sh <Project Name> <Project path> <SDK path> <Class (including the package name)>
  •  Here is an example
    ./run.sh UiAutomator ~/workspace/UiAutomator ~/Android/sdk Notes.CreateNewNote

Sunday, December 15, 2013

Working with Menu button, Text field and Long Press menus using UiAutomator

In this post, I want to explain the following things
  • How to work with Menu buttons in UiAutomator?
  • Working with Text fields in UiAutomator?
  • How to Read text from Text filed
  • Validating the text
  • Validate long press menus
Take example of Notes Application and automate the following tests
  1. Open "Notes" Application from AppTray
  2. Click on Menu button
  3. Click on "Add Note" button from the menu
  4. Enter Text "Note 1" in the Text field
  5. Read the text entered in the text box and validate it
  6. Click on "Save" button from the menu
  7. Add another note "Note 2"
  8. long press on "Note 1" and delete the note

 Here is the implementation:

Step 1: Open "Notes" application from the AppTray


Open UiAutomatorViewer, get the properties on Notes app

From the above screenshot, we can see the Notes application properties as
  • class = android.widget.TextView
  • package = com.android.launcher
  • text = Notes
  • index = 34
Create UiObject with the above properties and click on the Notes application if it is found. Code is below

 
// Look for the Notes application
 UiObject notesApp = appView.getChildByText(new UiSelector()
  .className(android.widget.TextView.class.getName()),
  "Notes", true);

 // Open Notes application
 if (notesApp.exists()) {
  notesApp.clickAndWaitForNewWindow();

 // Validate Notebook App by it's package name
 UiObject notesValidation = new UiObject(new UiSelector()
       .packageName("com.example.android.notepad"));
 assertTrue("Notes App not launched", notesValidation.exists());


Step 2: Click on Menu button

   // Click on Menu button
   UiDevice myDevice = getUiDevice();
   myDevice.pressMenu();

Uidevice class provides 'pressmenu' method to click on the menu button

Step 3: Click on "Add Note" from the menu

To click on "Add Note" button, get the properties of the button using UiAutomatorViewer. From the above screenshot we can get the properties of 'Add Note' button as follows
  • index = 0
  • text = Add note
  • class = android.widget.TextView
  • package = com.example.android.notepad
Create UiObject with the above properties and click on the button if it is found. Code snippet is below

  // click on 'Add Note' button
  UiObject addNoteButton = new UiObject(new UiSelector()
  .className(android.widget.TextView.class.getName())
 .text("Add note").index(0));
   
  if (addNoteButton.exists())
 addNoteButton.click();

Step 4: Enter "Note 1" in the text field

Pressing on "Add Note" button opens a text box to enter the new note. Select the text box and enter the text "Note 1"

With UiAutomatorViewer get the properties of edit text field and create an UiObject. After getting the properties of the text field, enter the text using "setText()" method. Code snippet is below
 

// Edit field to enter new Text
 UiObject addNoteText = new UiObject(new UiSelector()
  .className(android.widget.EditText.class.getName()).index(0));
   // Add note button in menu
 if (addNoteText.exists())
  addNoteText.setText("Note 1");

Step 5: Read and validate the text entered
 <br/>assertEquals("Note 1", addNoteText.getText());<br/>

Step 6: Click on "Save" button
From the above screenshot, we can get the properties of save button. "Save" button can be accessed by it's text property.

 // Save button in the menu
  UiObject saveNoteButton = new UiObject(
    new UiSelector().className(
    android.widget.TextView.class.getName()).text("Save"));

   if (saveNoteButton.exists())
   saveNoteButton.clickAndWaitForNewWindow();

Step 7: Add new note "Note 2"
  //------Add Note 2--------

  // Click on Menu button
   myDevice.pressMenu(); 

  // Add note button in menu
  if (addNoteButton.exists()) { 
    addNoteButton.click();

  // Add new Note 2       
  if (addNoteText.exists())
  addNoteText.setText("Note 2");

  assertEquals("Note 2", addNoteText.getText());

  //Click on Save button
  myDevice.pressMenu();

  if (saveNoteButton.exists())
      saveNoteButton.clickAndWaitForNewWindow();

}

Step 8: Long press on 'Note 1' and delete the note

To Long press on Note 1, we have get the properties of "Note 1" from the list of available notes. Get the properties of Notes from the UiAutomatorViewer

To access the Note 1 from the list, access it as a child object. To get the child object, we have to first get the property of entire list (list view) as a parent object and then the individual list items as child objects

        //Get the list of added Notes
 UiObject notesList = new UiObject(new UiSelector().className(
  android.widget.ListView.class.getName()).index(0));

 // Select Note 2 and long press on it
 UiObject noteListItem = notesList.getChild(new UiSelector()
  .className(android.widget.TextView.class.getName())
  .text("Note 1").longClickable(true));
  
 //Check if Note 1 exists in the list
 assertEquals("Note 1", noteListItem.getText());


Long press on the Note1 and select "Delete" button
To get the 'Delete' button property get the long press menu list view as parent object and then get the individual menu items as child objects. Code snippet is below


 // Long press the menu item
 noteListItem.longClick();

       //Long press menu 
 UiObject longPressNoteMenu = new UiObject(new UiSelector().className(
   android.widget.LinearLayout.class.getName()).index(0));
        
        UiObject note1Text = longPressNoteMenu.getChild(new UiSelector()
  .className(android.widget.TextView.class.getName()).index(0));
 
        //Check if Note 1 menu is opened
 assertEquals("Note 1", note1Text.getText());
 
 //Delete button in LongPress menu
 UiObject deleteButton = new UiObject(new UiSelector().className(
   android.widget.TextView.class.getName()).text("Delete"));

 //Check if delete button exists 
 assertTrue("Delete Button not found", deleteButton.exists());
        
        //Delete the note
 deleteButton.clickAndWaitForNewWindow();


Here is the complete code,
package Notes;

import org.junit.After;
import org.junit.Before;

import android.os.RemoteException;

import com.android.uiautomator.core.UiDevice;
import com.android.uiautomator.core.UiObject;
import com.android.uiautomator.core.UiObjectNotFoundException;
import com.android.uiautomator.core.UiScrollable;
import com.android.uiautomator.core.UiSelector;
import com.android.uiautomator.testrunner.UiAutomatorTestCase;

public class CreateNewNote extends UiAutomatorTestCase {

 // ----------------Global variables------------------------------

 // Get the device properties
 UiDevice myDevice = getUiDevice();
 // All App Tray Button
 UiObject AppTrayButton = new UiObject(new UiSelector().description("Apps"));

 // Get AppTray container
 UiScrollable appView = new UiScrollable(new UiSelector().className(
   "android.view.View").scrollable(true));
 // Apps Tab
 UiObject AppsTab = new UiObject(new UiSelector().className(
   "android.widget.TextView").description("Apps"));
 // Verify the launched application by it's Package name
 UiObject notesValidation = new UiObject(
   new UiSelector().packageName("com.example.android.notepad"));
 // Add Note menu button
 UiObject addNoteButton = new UiObject(new UiSelector()
   .className(android.widget.TextView.class.getName())
   .text("Add note").index(0));
 // Edit field to enter new Text
 UiObject addNoteText = new UiObject(new UiSelector().className(
   android.widget.EditText.class.getName()).index(0));
 // Get the list of added Notes
 UiObject notesList = new UiObject(new UiSelector().className(
   android.widget.ListView.class.getName()).index(0));
 // Save menu button
 UiObject saveNoteButton = new UiObject(new UiSelector().className(
   android.widget.TextView.class.getName()).text("Save"));
 // Long press menu
 UiObject longPressNoteMenu = new UiObject(new UiSelector().className(
   android.widget.LinearLayout.class.getName()).index(0));
 // Delete button in LongPress menu
 UiObject deleteButton = new UiObject(new UiSelector().className(
   android.widget.TextView.class.getName()).text("Delete"));

 // Actual Tests starts here

 @Before
 public void verifyNotesApp() {
  assertTrue("Notes App not launched", notesValidation.exists());
 }

 // Launch Notes Application
 public void testLaunchTestApp() throws RemoteException,
   UiObjectNotFoundException {

  // wakeup the device if the screen is Off
  if (!myDevice.isScreenOn())
   myDevice.wakeUp();
  // Press Home button
  myDevice.pressHome();

  // Launch Notes Application
  assertTrue("AppTray Button not found", AppTrayButton.exists());
  AppTrayButton.clickAndWaitForNewWindow();

  assertTrue("All Apps Tab not found", AppsTab.exists());
  // Set the swiping mode to horizontal (the default is vertical)
  appView.setAsHorizontalList();

  // Look for the Notes application
  UiObject notesApp = appView.getChildByText(new UiSelector()
    .className(android.widget.TextView.class.getName()), "Notes",
    true);

  // Validate Notebook App by it's package name
  assertTrue("Notes App not launched", notesValidation.exists());

  notesApp.clickAndWaitForNewWindow();

 }

 // Add Note1
 public void testAddNote1() throws RemoteException,
   UiObjectNotFoundException {

  // Click on Menu button
  myDevice.pressMenu();

  assertTrue("Add Note Button not found", addNoteButton.exists());
  // click on 'Add Note' button
  addNoteButton.click();

  // Add note button in menu
  assertTrue("Add note Text field is not found", addNoteText.exists());
  addNoteText.setText("Note 1");

  // Read the text enetered in Text box
  assertEquals("Note 1", addNoteText.getText());

  // Click on Menu button
  myDevice.pressMenu();

  // Save button in the menu
  assertTrue("Save Button not found", saveNoteButton.exists());
  saveNoteButton.clickAndWaitForNewWindow();

 }

 // Add Note2
 public void testAddNote2() throws UiObjectNotFoundException {
  // ------Add Note 2--------

  // Click on Menu button
  myDevice.pressMenu();

  assertTrue("Add note Button not found", addNoteButton.exists());
  addNoteButton.click();

  // Add note button in menu
  assertTrue("Add note Text field not found", addNoteText.exists());
  addNoteText.setText("Note 2");

  // Read the Text entered
  assertEquals("Note 2", addNoteText.getText());

  // Save button in the menu
  myDevice.pressMenu();

  assertTrue("Save Button not found", saveNoteButton.exists());
  saveNoteButton.clickAndWaitForNewWindow();
 }

 // Delete Note 1
 public void testDeleteNote1() throws UiObjectNotFoundException {
  // Select Note 2 and long press on it
  UiObject noteListItem = notesList.getChild(new UiSelector()
    .className(android.widget.TextView.class.getName())
    .text("Note 1").longClickable(true));

  // Check if Note 1 exists in the list
  assertEquals("Note 1", noteListItem.getText());

  // Long press the menu item
  noteListItem.longClick();

  UiObject note1Text = longPressNoteMenu.getChild(new UiSelector()
    .className(android.widget.TextView.class.getName()).index(0));

  // Check if Note 1 menu is opened
  assertEquals("Note 1", note1Text.getText());
  assertTrue("Delete Button not found", deleteButton.exists());

  deleteButton.clickAndWaitForNewWindow();
 }

 @After
 public void closeNotesApp() {
  getUiDevice().pressBack();
 }

}


Thursday, December 5, 2013

How can we handle Toggle Switch in UiAutomator?

Let us see how we can handle toggle buttons in UiAutomator. I am taking an example of toggle Wi-Fi buttons from settings page.

Test steps:
1. Launch settings application from the App tray
2. Go to Wi-Fi Settings and toggle the wi-fi settings

Test Procedure:

Step 1: Follow this post on how to launch settings application from App tray

Step 2: Toggle wi-fi settings

Before accessing the wi-fi settings, let us write small code to check if the settings application is already launched. Because the UiAutomatorTestCase class extends junit.framework.TestCase, we can use the JUnit Assert class to test that UI components in the app return the expected results

    // Validate that the package name is the expected one
      UiObject settingsValidation = new UiObject(new UiSelector()
         .packageName("com.android.settings"));
      assertTrue("Unable to detect Settings", 
         settingsValidation.exists()); 

Now, let us get the properties of Wi-Fi settings from UiAutomatorViewer

From the above Screnshot, we can get the properties of Wi-Fi settings,
  • Index = 1
  • class = android.widget.LinearLayout
  • scrollable = false
Using these properties, we can create UiObject for Wi-Fi settings. it is also clear that "Switch: ON" and "TextView: Wi-Fi" are child objects of the LinearLayout.
 

UiObject WiFiSettings = new UiObject(new UiSelector().className("android.widget.LinearLayout") .scrollable(false).index(1));
if(WiFiSettings.exists())              WiFiSettings.click();

Now, let us create child object for "Switch: ON"

UiObject WifiOnButton = WiFiSettings.getChild(new UiSelector().text("ON"));

if (WifiOnButton.exists()){              WifiOnButton.click();


If the Wi-Fi is already turned off, we can get the properties of "Switch:OFF"

 
UiObject WifiOffButton = WiFiSettings.getChild(new UiSelector().text("OFF"));
if (WifiOffButton.exists())
 WifiOffButton.click();
Here is the complete code
 public void testToggleWiFiSettings() throws RemoteException,
   UiObjectNotFoundException {

  // Validate that the package name is the expected one
  UiObject settingsValidation = new UiObject(
    new UiSelector().packageName("com.android.settings"));
  assertTrue("Unable to detect Settings", settingsValidation.exists());

  // Wi-Fi settings
  UiObject WiFiSettings = new UiObject(new UiSelector()
    .className("android.widget.LinearLayout").scrollable(false)
    .index(1));

  if (WiFiSettings.exists())
   WiFiSettings.click();

  // Switch ON
  UiObject WifiOnButton = WiFiSettings.getChild(new UiSelector()
    .text("ON"));
  // Switch OFF
  UiObject WifiOffButton = WiFiSettings.getChild(new UiSelector()
    .text("OFF"));

  if (WifiOnButton.exists()) {
   WifiOnButton.click();
  } else if (WifiOffButton.exists()) {
   WifiOffButton.click();
  }

 }

How to launch Settings Application using UiAutomator?

Let us a write a program to Automate the case to toggle the Wi-Fi

Test Case:
1. From the Home page, click on App Tray icon
2. Launch settings from the App Tray by clicking on the Settings icon
3. Turn ON/OFF wi-fi from settings page

Test Procedure:

Step 1: Click on App Tray Icon
See the previous post to know how to click on the App Tray

Step 2:  Launch Settings
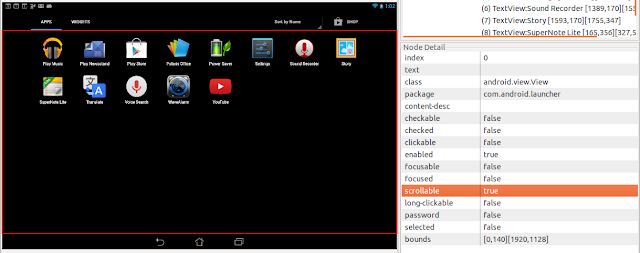
From the App Tray, we have to click on the "Settings" icon. App Tray is a scrollable container, we can scroll it horizontally

First screen:

Second screen:

From the above screen it is clear that the settings icon is present in the second screen of the App tray. To click on the settings icon, we have to navigate to the second screen and then click on the settings icon.

Using "UiScrollable" class, we can simulate vertical or horizontal scrolling across a display. This technique is helpful when a UI element is positioned off-screen and you need to scroll to bring it into view.

Create a scrollable object for App view using the class "android.view.view" shown in the UiAutomatorViewer. You can also use the property "scrollable=true"

The following code explains how to create a scrollable object

UiScrollable appViews = new UiScrollable(new UiSelector().className("android.view.View")
        .scrollable(true));


After the scrollable object is created, we have to specify the swipe direction. Default is the vertical scrolling. Since our App view only supports the horizontal swipe, set the direction as horizontal


appViews.setAsHorizontalList();

Now, in the App tray we have to look for the "Settings" application. From the following screenshot, we can get it's class name as 'android.widget.TextView' and contains the text "Settings". Using these properties, we can create a UiObject for Settings app.


Since the settings app is inside the App tray, we have to create a child object for App tray.

   UiObject settingsApp = appView.getChildByText(new UiSelector()
        .className(android.widget.TextView.class.getName()),
        "Settings",true);

In the above code we have used the method "getChildByText(childPattern, text, allowScrollSearch)", which accepts three arguments
     a. Child pattern -- select pattern for the UI element
     b. text  -- Text of the element
     c. AllowScrollSearch -- accepts either true/false. If value is set to true, then UiAutomator will search for the element in all the screens by scrolling the view. When it is set to false, then UiAutomator will only search in the current screen. Since the Settings app is in the second screen, we have to set "allowScrollSearch" to true.


Here is the code   

    //Launch Settings from App Tray
    public void testLaunchSettings() throws UiObjectNotFoundException{

        UiObject AppsTab = new UiObject(new UiSelector().className("android.widget.TextView").description("Apps"));

        if(AppsTab.exists())
            AppsTab.click();
       
        UiScrollable appView = new UiScrollable(new UiSelector().className("android.view.View")
        .scrollable(true));
    
     // Set the swiping mode to horizontal (the default is vertical)
     appView.setAsHorizontalList();
    
     // Search for the settings application in all the screens
     UiObject settingsApp = appView.getChildByText(new UiSelector()
        .className(android.widget.TextView.class.getName()),
        "Settings",true);
    
    if(settingsApp.exists())
     settingsApp.clickAndWaitForNewWindow();
      
    }


Tuesday, December 3, 2013

Writing your first test in UiAutomator


Configure your development environment
If you're developing in Eclipse, the Android SDK provides additional tools that help you write test cases using uiautomator and buiild your JAR file. In order to set up Eclipse to assist you, you need to create a project that includes the uiautomator client library, along with the Android SDK library.
To configure Eclipse:  

  1. Create a new Java project in Eclipse, and give your project a name that is relevant to the tests you’re about to create (for example, "MyAppNameTests"). In the project, you will create the test cases that are specific to the application that you want to test.
  2. From the Project Explorer, right-click on the new project that you created, then select Properties > Java Build Path, and do the following:
    1. Click Add Library > JUnit then select JUnit3 to add JUnit support.
    2. Click Add External JARs... and navigate to the SDK directory. Under the platforms directory, select the latest SDK version and add both the uiautomator.jar and android.jar files.
If you did not configure Eclipse as your development environment, make sure that the uiautomator.jar and android.jar files from the <android-sdk>/platforms/<sdk> directory are in your Java class path.
Once you have completed these prerequisite tasks, you're almost ready to start creating your uiautomator tests.


First Test case:
1. Open App tray by clicking on the AppTray icon at the center
2. Click on Apps Tab
3. Click on Widgets Tab


Let us automate above test case using UiAutomator

Step 1: Click on App Tray icon


Procedure:
1. Connect your device to your PC
2. Make sure Android sdk path is added to PATH variable
3. run the command "uiautomatorviewer" to launch the UiAutomator viewer
4. Move your mouse hover the App Tray icon, it shows the properties on the right pane.
5. In the above screenshot, it shows the content description as "Apps"
6. Write java code to launch the App Tray icon having the content description "Apps"

here is the code


//Get the device state

UiDevice mydevice = getUiDevice();


//If screen is off, wake up the device (make sure the screen lock is set to None)

if(!mydevice.isScreenOn()){

    mydevice.wakeUp();

}


//Press Home button 

mydevice.pressHome();


//Create UiObject instance for the UI element

UiObject AppTray_Button = new UiObject(new UiSelector().description("Apps"));


//Check if the button exists

if(AppTray_Button.exists()){

    //Click on the Button

    AppTray_Button.clickAndWaitForNewWindow();

}


UiDevice:
Represents the device state. Using which, we can to check the state of various properties, such as current orientation or display size and to perform device level actions, such as forcing the device into a specific rotation, pressing the d-pad hardware button, or pressing the Home and Menu buttons

To get the access, create an instance of UiDevice


UiDevice mydevice = getUiDevice();

 mydevice.pressHome();

UiObject:
Represents a UI element. To create a UiObject instance, use a UiSelector that describes how to search for, or select, the UI element


UiObject AppTray_Button = new UiObject(<Ui Selector instance>);

UiSelector:
Represents a search criteria to query and get a handle on specific elements in the currently displayed UI. If more than one matching element is found, the first matching element in the layout hierarchy is returned as the target UiObject. When constructing a UiSelector, you can chain together multiple properties to refine your search. If no matching UI element is found, a UiAutomatorObjectNotFoundException is thrown. You can use the childSelector() method to nest multiple UiSelector instances.

The following code shows how to select an UI element having the desciption "Apps"


UiObject AppTray_Button = new UiObject(new UiSelector().description("Apps"));
Click on the Ui element:
You can reuse the UiObject instances that you have created in other parts of your app testing, as needed. Note that the uiautomator test framework searches the current display for a match every time your test uses a UiObject instance to click on a UI element or query a property.

Using the UiObject "AppTray_Button", we can check if the button exists in the current display and click on the Apps button if it exists


if(AppTray_Button.exists()){

        AppTray_Button.clickAndWaitForNewWindow();

}


Step 2: Click on the Apps tab

1. In the Step 1, after clicking the Apps icon, it launches App Tray
2. Check if the Apps tab exists
3. Click on the Apps Tab


If you look at "Apps" Tab properties, the element has content description "Apps" and having the class name "com.widget.textview". Use UiSelector to select the element matching these properties


UiObject AppsTab = new UiObject(new UiSelector().className("android.widget.TextView").description("Apps"));
       
Click on the Apps tab if it exists

if(AppsTab.exists()){

    AppsTab.click();

}

Step 3: Click on Widgets Tab

1. Check if Widgets tab exists
2. Click on the widgets tab

Select the UI Element having the Textview class and description "Widgets"


UiObject WidgetsTab = new UiObject(new UiSelector().className("android.widget.TextView").description("Widgets"));


Since the Widgets tab was not selected by default, you can also use the property "selected = false"


UiObject WidgetsTab = new UiObject(new UiSelector().className("android.widget.TextView").description("Widgets").selected(false));

Here is the complete code:

package clock.ui;

import android.os.RemoteException;   

import com.android.uiautomator.core.UiDevice;

import com.android.uiautomator.core.UiObject;

import com.android.uiautomator.core.UiObjectNotFoundException;

import com.android.uiautomator.core.UiSelector;

import com.android.uiautomator.testrunner.UiAutomatorTestCase;


public class Screen1 extends UiAutomatorTestCase{   


    public void testTestScreen1() throws RemoteException, UiObjectNotFoundException{


        //Get the device state

        UiDevice mydevice = getUiDevice();        


        //If screen is off, wake up the device (make sure the screen lock is set to None)

        if(!mydevice.isScreenOn()){

            mydevice.wakeUp();

       }


        mydevice.pressHome();


        //Create UiObject instance for the UI element

        UiObject AppTray_Button = new UiObject(new UiSelector().description("Apps"));


        //Check if the button exists

        if(AppTray_Button.exists()){


            //Click on the Button

            AppTray_Button.clickAndWaitForNewWindow();

        }        


        //Get instance of Apps Tab 

        UiObject AppsTab = new UiObject(new UiSelector().className("android.widget.TextView").description("Apps"));


        //Check if the Apps Tab exists

        if(AppsTab.exists()){

            AppsTab.click();

        }


        UiObject WidgetsTab = new UiObject(new UiSelector().className("android.widget.TextView").description("Widgets").selected(false));


        //Check if Widgets tab exists

        if(WidgetsTab.exists()){

            WidgetsTab.clickAndWaitForNewWindow();

        }


     }

}